Pages

Friday, September 21, 2012

Making the Bun in the Oven a Blanket

So lately I've been hard at work making things for our soon-to-be addition to the family. As of this past week, it has consisted of brainstorming what the baby's quilt should look like. I know I wanted to do something with elephants and the colors blue, white, and gray so I searched the internet for ideas. I finally just decided to make up my own because their weren't very many on the internet that looked fit for a nursery.

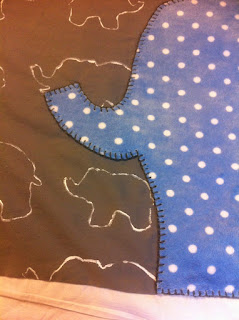
I started with my elephant cookie cutters that I bought a couple months ago, some white fabric paint, and an old gray sheet. I dipped the cookie cutters in the paint and stamped them onto the fabric longways in variating rows. Once that dried I added a 4" white border from another old sheet I had lying around.


If you have watched my Cloth Revolution Diaper Tutorial you would know about my blue and white polka dotted "microfleece"situation. Well after having to find a use for it I felt like this quilt was perfect for the use of that fabric. So I sketched out half of an elephant on the back of it, cut it out, "heat bonded" it to the fabric I just got finished stamping, and sewed a blanket stitch around the border in a dark gray thread.


Here's a close up so you can see the endless hours and hurt fingers I put into this simple border.


Then I decided the quilt needed something else. So I took some more embroidery floss and made rough thick stitches with 1/2" places in between. Here you can see it getting started and the quilt as a whole.


Here's a close up of the stitching. Needless to say there were more soar fingers involved in this process (I guess that's why people wear thimbles?).


So I eventually added enough stitching to the border to make me satisfied using a pattern of: Light blue, Blue, Dark Gray, Dark Gray, Blue, Light Blue. Then I pinned the back of the quilt to the front. This was just a piece of white fabric (left over from the sheet I cut up) so I didn't take pics.


Then I got to work pinning the binding around the quilt. I choose light blue because I didn't want the quilt to be predominantly gray.


Once I got that stuff sewn on using my sewing machine (might I say binding isn't as easy as it looks to put on) I was finished. I think it turned out just gorgeous. Now I just have to work on the mobile, the bumper, and the lamp. Good thing I still have until January!


♥ Mrs. Suzie

Wednesday, September 19, 2012

How to make your own enzyme cleaner!


So lately I've been on this kick to make my own house cleaning products. After revising my laundry detergent post and seeing how amazingly cheap it is to make, I wanted to make some more cheap products around the house because I go through that stuff like water! After numerous hours of searching and experimenting I found a recipe for Citrus Enzyme cleaner. Words can't describe how excited I was. (Mostly because when you cloth diaper it is good to have an enzyme cleaner to get the "funk" smell out of them and that stuff isn't cheap!)

This cleaner is very comparable (pretty much identical!) to other enzymes sprays such as BacOut. This spray runs about $9 per bottle NOT CONCENTRATED! The ingredients are enzyme cultures, Lime extract, Stabilizers, Surfactants, and water (so basically lime, water, and sugar). After researching enzyme cleaner I found out that pineapples have the most enzymes and make a better cleaner.

So I guess you guys are ready for the recipe:

What you will need is:

  1. A container with a lid that can hold 2 liters (I used an old milk jug)
  2. 1 1/2 to 2 cups of fruits scraps (such as lime peels)
  3. 7 tbsp of brown sugar (this is to feed the enzymes)
  4. 1 tsp of yeast (doesn't matter which kind)
  5. 1 liter of water
  6. funnel
  7. 2 weeks time!
How to make it:
  1. Cut up your fruit scraps so that they will fit into the opening of your container (I used pineapple and lime!) and put them into a measuring cup to measure out about 2 cups of fruit scraps.
  2. Stuff the fruit into your container and add the yeast and the brown sugar into the container using a funnel.
  3. Pour in your 1 Liter of water through the funnel to collect any extra sugar and yeast.
  4. Screw the lid on and shake the container to mix everything together.
  5. Loosen the lid to let any gas buildup flow out of the container.
  6. Label with the date you made it and the date for 2 weeks from the day you made it (this is when it will be ready for use).
  7. Store in a cool, dark place (such as your pantry).
  8. Shake the container everyday for the first week making sure when you put it up for storage that the lid is loosened (We don't want explosions people!).
  9. Once the two weeks are up strain your enzyme cleaner and store for further use.
How to use it:
  • All purpose cleaner = 1 part enzyme to 10 parts water.
  • Stains and Odors = just dilute
  • Dishes and Laundry = 1/4 of enzyme
  • Drain blockages and smell = concentrated or use strained fruit scraps
  • Mopping floors = 1 part enzyme to 20 parts water
  • Face cleaner = 1 part enzyme to 2 parts water
  • Insect repellent = unse diluted
  • Clean washing machine = 2 cups enzyme in detergent drawer (run through normal cycle at 98 degrees F)
  • Glass cleaner = 1 part enzyme to 3 parts water
If you would like to watch how I made my enzyme cleaner you can view it here:


Check back in two weeks for my review on this cleaner and it's wonderfulness!


♥ Mrs. Suzie

Thursday, September 6, 2012

Cloth Revolution Diaper tutorial

I FINALLY have made a cloth diaper tutorial using the Cloth Revolution pattern. I used 1 1/2" velcro in the tute while following the directions for the pocket diaper. I absolutely love it and will make more! So here is the video, let me know what you think :)


♥ Mrs. Suzie