Pages

Wednesday, January 11, 2012

How to Make Yarn with Plastic Bags

People have been trying to find new ways to reuse a lot of plastic and paper items to help in the effort to clean up the earth and what better way to recycle plastic bags then making your own yarn. You can make practically anything with it which makes it so awesome. Remember though that it is still plastic, so no potholders and such!


What you will need:

  • Plastic bags
  • Scissors
  • Crocheting Needle (Size G preferred)
  • Pattern (I'm making circles)


How to do it:

  • Lay your plastic bag out and press it flat. It's going to look kind of rectangular

  • Cut your bag into strips that are 1/2" or a thumbs width wide, cutting the bag from the bottom towards the handles. They will be end up being little loops.
 
  • Once you have cut up as many bags as you think you need, start chaining them together by stringing one bag loop through another and then back through itself and pull tight, but not too tight, you don't want to stretch the bag loop out.


  • Keep doing this until all of your loops are linked together. At this point you can roll your links together into a ball for easier clean-up and organization.
  • Now that you have made your plastic bag yarn you can use basically any pattern to create something unique!
Here is a circle that I have crocheted using a pattern I found on youtube:


♥ Mrs. Suzie

Saturday, July 16, 2011

♻ Fabric Grocery Bags ♻

With the amount of plastic bags pilling up in landfills it has become a great effort to bring your own bags to the grocery so why not make them unique and personalized.

What you will need:

  •  durable non-strechy material
  • scissors
  • sewing machine or needle and thread
  • thread of your choosing
  • ruler
What to do:
  • Lay your fabric out on a clean, solid surface. For a bag measuring 15" x 17" x 7", measure out a rectangle 40" long (this includes the two sides, the bottom, and seam allowance of the bag) by 18"wide (this is the width plus seam allowance).
  • Cut out the rectangle you just measured out. Fold each of the long sides in 1/4" and press with an iron. Fold in again another 1/4", press, and sew a 1/4" seam. Do this to the shorter sides also.
  • Fold the rectangle in half and mark the middle. From the middle measure out 7" on both sides and mark. Pull these marks towards the center and sew towards the center following the the seam already sewn.
  • Sew up the side seams and your bag is finished. You can add ribbon for handles or cut some of your remaining fabric 4 1/2" wide by your desired length. Fold rectangle long ways and sew up the seams with 1/4" allowance. Turn tube inside out, press and sew to your bag.
For extra personality you can use the Screen print post and add a design to the front of your bag.


♥ Mrs. Suzie

Tuesday, May 31, 2011

How to make Bows for little girls

Little girls always look super cute with bows in their hair but you might feel silly buying them when you know you could make them yourself. So why not learn?!

What you will need:

  • 22 inches of 1" wide ribbon
  • 1/4" wide ribbon for center
  • Scissors
  • Needle
  • Matching Thread
  • Hot glue gun
How to do it:
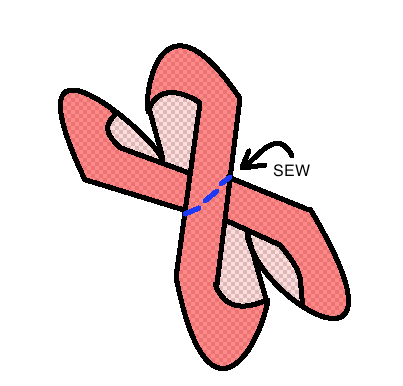
  • Fold your 1" ribbon in half and crease the middle by pinching it
  • With the right side of the ribbon on a hard surface take both ends and twist them towards the middle

  • Pull the loops you just created (right side up) towards the center to make an X

  • Adjust the loops so that they are all roughly the same size.
  • Sew three stitches down the center of the X and pull tight. Wrap the thread around the bow to keep it tight, tie a knot in the string, and cut it off.

  • Now you can wrap the smaller ribbon around the center and either sew or glue into place
Now you have a bow that you can glue to a barrette.

If you have any questions feel free to ask!!


♥ Mrs. Suzie 

Wednesday, May 18, 2011

How to make your own binding

When making a garment an easy way to create a finished look around neck holes and arm holes is o add binding. It is a lot easier than trying to fold the edges and sew them down.

Materials:

  • Fabric of your choice
  • Scissors
  • Iron

Directions:
  • To make 1/2 inch binding: Measure the length of where you want your binding. On the short side of your fabric measure out 2 inches wide and then the length that you measured out plus 2 or 3 inches.
  • Fold the rectangle hot dog style and iron it down.
  • Then fold the ends into the center fold and iron down.
  • Refold the center so that the rectangle is now 1/2 wide instead of 1 inch. 
  • Viola! Binding!


♥ Mrs. Suzie

Wednesday, May 4, 2011

DIY Screen Print

Screen prints are a good way to make your own personal design and be able to recreate that same image multiple times. You can use all kinds of permanent substances to make the image such as ink, paint, bleach gel, etc.

Materials

  • A sheer curtain
  • Embroidery loop
  • Waterproof glue
  • Paint brush
  • Fabric Paint (or other substance of your choosing)
Directions:

  • Place the embroidery loop on the curtain and draw a circle around the loop about 2 inches bigger.
  • Cut out the circle you just drew and place inside the embroidery loop and pull it tight. Trace the image you want on the circle of sheer curtain.

  • Paint around the image in glue (filling all non-parts of the image).

  • After the glue dries (about 6 hours) place the screen onto your selected fabric and paint the image onto the fabric. (if you are doing this with bleach gel don't leave it on for more than an hour because you could damage your fabric) Depending on the type of fabric you might want to do two layers of paint.

  • Gently pull the screen off being careful not to move the fabric. Let the image dry over night. Rinse the screen off and let it dry (this will take less than 30 min).

  • Store the screen to be used again.
    The screen can be used again and again.


    ♥ Mrs. Suzie

    Sunday, April 24, 2011

    Clogged Drain? Clean it up! With Baking Soda!

    A little trick that I have learned is that baking soda can be used for EVERYTHING! Especially when cleaning. If you ever get a clogged drain and don't want to spend money on expensive drain cleaner, here is a simple way to do the same job with only 2 house hold products and water!

    Things you will need:

    • 1/2 baking soda
    • 1 cup of vinegar
    • 1 gallon of boiling water


    Instructions:

    • Shove the baking soda down your drain. This is kind of tricky because, like when I did it, the baking soda got stuck so I ended up using the handle of my measuring cup to shove it down the drain.

    • Once you think you have the baking soda down far enough, pour 1/2 cup of vinegar down the drain making sure to cup your hand over the drain to make the bubbles go down the drain not into your tub.

    • Pour the rest of the vinegar down the drain, cupping the drain like you did before, and let it sit 10-15 minutes. Pour the boiling water down the drain and you're done.

    CAUTION! Don't do this too much at one time to your drains because it can harm your them. Allow only 3 times per one unclogging.


    ♥ Mrs. Suzie

    Friday, April 22, 2011

    Photograph Words and Names


    Need something to cover that empty wall or just looking for something fun and simple to do? These photographed letters turned into words has become quite popular and looks so nice hanging on the wall in the entrance of your home. People have been ordering these with words ranging from last names to words of inspiration. Well I have come up with a simple and easy way to make them all on your own.

    Things you will need:

    • Camera
    • Poster Board/ Matting
    • Picture Frame
    • Scissors or Exacto Knife
    • Ruler
    • Pencil
    Instructions:
    • Before you do anything, you need to find a frame to be able to hold your letters. If you are going to use a standard 4" by 6" photo you can use this equation to figure out the size you need.
      • (number of letters) x 3.75" + (number of letters - 1) x 0.5" = the minimal length
      • As long as the height is larger than 6" you are fine.
      • Here is a diagram to help you picture it:


    • Go around town taking various, vertical pictures of the letters you are wanting keeping in mind that even though the letter needs to fill up the frame of the camera you also needs about a 1/2" allowance on all sides.
    • Print out your pictures. It really doesn't matter if it's on photo paper or not it's just a preference.
    • Now the tough part begins. Cut out your poster board or matting to fit the size of the frame. Take the "minimal length" that you calculated from earlier and subtract it from the length of the frame and divide it by 2, this is the width of the space between the frame and the first photograph length-wise. Mark this width in the center of the short side with a pencil, see mark "A" in diagram.

    • Next mark out 5 3/4" out from the last mark, mark "B". Then mark out 1/2", mark "C".

    • Continue mark "B" and mark "C" until you have the same number of "B" marks as the number of letters you are wanting to add, making sure that you end with mark "B" not "C". Measure the remaining space to the end of the board and make sure that it is the same a mark "A".

    • Next take the height of the frame, subtract it by 5.75", and divide it by 2, this is mark "D". Extend mark "D" to the other end of the board, as shown as the 2 red lines in the diagram. Then extend all of your original marks to the mark "D" lines, as shown as the blue lines in the diagram.

    • Now with the ruler cut out all of the "B" boxes and tape your pictures in the center of the boxes in order starting from your right to your left.
    • Put the board in the frame and viola!
    ♥ Mrs. Suzie