Pages

Tuesday, May 31, 2011

How to make Bows for little girls

Little girls always look super cute with bows in their hair but you might feel silly buying them when you know you could make them yourself. So why not learn?!

What you will need:

  • 22 inches of 1" wide ribbon
  • 1/4" wide ribbon for center
  • Scissors
  • Needle
  • Matching Thread
  • Hot glue gun
How to do it:
  • Fold your 1" ribbon in half and crease the middle by pinching it
  • With the right side of the ribbon on a hard surface take both ends and twist them towards the middle

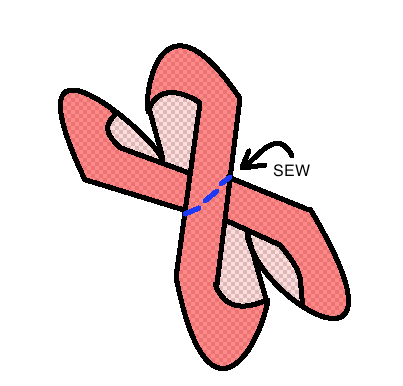
  • Pull the loops you just created (right side up) towards the center to make an X

  • Adjust the loops so that they are all roughly the same size.
  • Sew three stitches down the center of the X and pull tight. Wrap the thread around the bow to keep it tight, tie a knot in the string, and cut it off.

  • Now you can wrap the smaller ribbon around the center and either sew or glue into place
Now you have a bow that you can glue to a barrette.

If you have any questions feel free to ask!!


♥ Mrs. Suzie 

Wednesday, May 18, 2011

How to make your own binding

When making a garment an easy way to create a finished look around neck holes and arm holes is o add binding. It is a lot easier than trying to fold the edges and sew them down.

Materials:

  • Fabric of your choice
  • Scissors
  • Iron

Directions:
  • To make 1/2 inch binding: Measure the length of where you want your binding. On the short side of your fabric measure out 2 inches wide and then the length that you measured out plus 2 or 3 inches.
  • Fold the rectangle hot dog style and iron it down.
  • Then fold the ends into the center fold and iron down.
  • Refold the center so that the rectangle is now 1/2 wide instead of 1 inch. 
  • Viola! Binding!


♥ Mrs. Suzie

Wednesday, May 4, 2011

DIY Screen Print

Screen prints are a good way to make your own personal design and be able to recreate that same image multiple times. You can use all kinds of permanent substances to make the image such as ink, paint, bleach gel, etc.

Materials

  • A sheer curtain
  • Embroidery loop
  • Waterproof glue
  • Paint brush
  • Fabric Paint (or other substance of your choosing)
Directions:

  • Place the embroidery loop on the curtain and draw a circle around the loop about 2 inches bigger.
  • Cut out the circle you just drew and place inside the embroidery loop and pull it tight. Trace the image you want on the circle of sheer curtain.

  • Paint around the image in glue (filling all non-parts of the image).

  • After the glue dries (about 6 hours) place the screen onto your selected fabric and paint the image onto the fabric. (if you are doing this with bleach gel don't leave it on for more than an hour because you could damage your fabric) Depending on the type of fabric you might want to do two layers of paint.

  • Gently pull the screen off being careful not to move the fabric. Let the image dry over night. Rinse the screen off and let it dry (this will take less than 30 min).

  • Store the screen to be used again.
    The screen can be used again and again.


    ♥ Mrs. Suzie